Wednesday, February 29, 2012

Duct Tape Clutch


This is what I've been working on today....A Duct Tape Clutch!

So fun, I just love it!  The front is kind of plain because I haven't decided what I want to do with it yet.

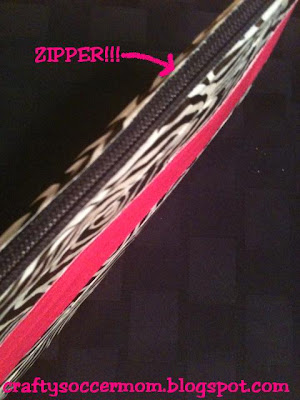
My favorite part about this clutch....


I added a Zipper!  Yep I said it..a ZIPPER!!!

And here's a look inside..


On one side I have 3 credit card slots...lined with Hot Pink


And on the other side a pocket for your cell phone or whatever...


Isn't that cute? 
The dimensions are approx 8.5in x 5.5in

Keep in mind since it's ALL Duct Tape (minus the zipper of course), that means its waterproof!
This would be excellent for trips to the beach, you could use it as a wallet.
You could use it as a make up bag as well, or as a pencil pouch for school.

The best part about this project, aside from the zipper, is that I found this Zebra print Duct Tape on clearance for $1.68! That's a smoke'n deal!

Hope you enjoyed taking a look at my Duct Tape Clutch :)

Happy Crafting!

Monday, February 27, 2012

Package Pal Loot

Hello!

Sorry I've been M.I.A. all week, I was really sick...but I'm baaaaaaaaccck!

So a few weeks ago I did a post about Package Pals.  A fun homemade gift exchange hosted by Jamie over at 

I was given a pal, randomly selected by Jamie, and I was to either make my pal something or give her some crafting supplies.

So this is what I made my pal...The only thing I really know about her is that she likes the color Red..


A Duct Tape Makeup Bag, Duct Tape Book Mark, Duct Tape Hair Bow, and Daisy Earrings..
all made by yours truly.


Here's the Duct Tape Bag...doesn't have to be for Makeup.
I made some ruffles on it...
Oh and here's the best part about it....


It has a Ziploc enclosure!!!
I know I know...I'm so rad!
I totally love this..I'll be making myself one too :)


Next we have our Duct Tape Bookmark...cute huh?
The back is solid Red, and it has Red & White Ribbon on top.


Here we have one of my infamous Duct Tape Bows...Red just for her.
I sell a lot of these little bad boys...I have hundreds of different styles.
There is a bobby pin on the backside.


Last but not least a pair of my Daisy Earrings..In red of course to go along with the theme.
These are made of very lightweight plastic.

So there you have it.  My gift to Donna, my package pal.

Hope she likes it!

Have a great day
and 
Happy Crafting!

Tuesday, February 21, 2012

DIY Dog Toy

Good Morning!


Today I'm showing you this DIY Dog Toy I made for my pug Obi

This is so simple and self explanatory that I didn't take pics as I went along.

All I did was cut up some T-Shirts (I have a stock pile for crafts) into 1 inch- 1 1/2 inch wide strips and about 15 inches long...

I used only 10 strips cause I have a small dog and didn't need a big toy.

I tied a knot in the middle and then braided the fringe.

After I braided a section of fringe I used a needle and thread and did a couple stitches to the end of the braid to keep it together.
Nothing fancy..it's a dog toy :)

NOW..

You can also cut long strips, make one long thick braid,  and then tie a knot on each end..which I think I'll do next time.

I would suggest making the strips at least 20 inches long if doing that..possibly more.

Easy Peasy!


"Obi...here's a new toy!"
He's got that...Mommy's talking to me in that high pitched voice look right now LOL


"Ugh..really? Ok..I posed..where's my treat woman!"

Have a great day 
and
Happy Crafting!

Monday, February 20, 2012

Easy Monkey Bread


Ohhhhhh yeah! 
Check out that oooey gooey goodness!
All that can be yours...and I'm going to show you how with just a few easy steps :)

Let's get this party started!

Here's What You Need:
4 Pack of Refrigerator Biscuits (10oz)
1/2 Cup of Sugar
1/2 Cup of Brown Sugar
3/4 Cup of Butter
1-2 Teaspoons of Cinnamon *optional*
Bundt Pan

Start by Preheating your Oven to 350 degrees

Next lightly spray your Bundt Pan with Cooking Spray.

Get a Gallon Size Ziploc Bag and add your Sugars and Cinnamon.


Take your biscuits and with clean kitchen scissors cut them all in half
and put the cut biscuits in the Ziploc with the sugars and shake it up.
Then transfer the biscuits into Bundt Pan.

I did one package of biscuits at a time..cut them, then put them in the baggie, tossed them, then put them in the Bundt Pan, and then repeated with the next roll of biscuits.


Here they are in the pan all coated with the sugars 


Next take your butter, pop it in the microwave and melt it...once melted add the sugar that was left in the Ziploc to the butter and mix it up.
You could do this on the stove top too if you'd prefer.
Once incorporated, drizzle on top of the biscuits.

Pop it in the oven for about 30 minutes.
Or until golden brown and no longer doughy in the center.

 
Once it's done, take it out of the oven and let it sit for a few minutes.
Then put a plate over the top of the Bundt Pan, and flip it upside down.

Isn't that gorgeous!

Let me tell you...everyone will LOVE this!

Perfect for brunches, holiday's, or a nice Sunday breakfast...

Have the kids join in the fun, and let them shake the biscuits in the bag, they'll love it!

Enjoy!

Saturday, February 18, 2012

Wedding Anniversary

Happy Anniversary to me and the hubs!

Today is my wedding anniversary and so I thought I would gush about me and my man for a bit.

So when my hubby and I met we connected right away...3 months into dating we knew were going to get married, 5 months into dating we bought a brand new house together... 11 months into dating we got engaged..and within a year after that, we got married.

But lets back up..I want to tell you how he proposed.

I knew the time was coming, he was going to propose...we both knew it but he really enjoyed me not knowing when or how..and so did I, that's all part of the fun.

So we went on this trip to Maui and I totally thought he was going to propose to me there...I mean hello..it's Maui right? Plus all my family and friends were filling my head up with the fact that he was totally going to do it.
But he didn't.  And I was bummed.  And I had to come back and tell everyone he didn't propose to me.
He later told me he didn't do it then because everyone thought he would, including me, and it wasn't as big of a surprise....I think he made the right decision :)

So soon after we got back he planned a Mother's Day brunch at a fancy restaurant down on the water.
It was me, Bob, my oldest son, my parents and sister and his mother and grandfather.

When the waiter came over my hubby to be said "I'll have a Mimosa please" and I said "OOh, me too please!" that sounds nice.
We were all enjoying our meal, but my Dad looked really uneasy...I asked my Mom what was wrong with Dad, she said nothing...hmm..ok...
(turned out he was nervous for me)
 Towards the end of our meal, my Mom said "Take a drink of your water", and I said "I have a Mimosa", she politely yet more sternly said "Take a drink of your water" and then she stood up with her camera..
I was like "Okkkk...weird-o"
So I indulged and took a drink of my water, but as I was taking a sip I noticed something sparkly at the bottom..

O...M...G...THATS A DIAMOND RING!

My husband walks over as I try to hold back tears and get the ring out of the bottom of the glass, I actually had to use a fork to get it out LOL..
He got on one knee, said a sweet little speech and asked me to marry him right there in the middle of the restaurant.

All eyes on me...I was beat red, totally in shock and embarrassed...and without even thinking twice I said "YES!!!"

All of a sudden there are tears flowing...people in the restaurant clapping...some even tearing up (mind you I did not know these people LOL)

It was Ah-mazing! 
He got me...I was totally surprised and it was romantic and I loved every minute of it.

Now here we are two boys, a dog, and two cats later...still happy as ever, and having a blast just live'n life.


CHEERS!

Hope you enjoyed my love story :)

Friday, February 17, 2012

11 things about me...

Hello Ladies!

Emily over at Insanity Rules tagged me in today's blog post.
I'm supposed to tell you 11 things about muah..and then answer 11 questions that she gave me, and last but not least come up with 11 questions for 11 other fellow bloggers...wheww!

So here it goes!

11 Things About Me


  1. I'm super short..only 5'1...I've been the brunt of many jokes like "Do you need a car seat to drive?" The sad part is that legally..I almost do LOL
  2. Since the age of 5 years old I wanted to be in Law Enforcement...I started out wanting to be a Police Officer, then a detective, and then a profiler...deep down I still want to be one of those.
  3. I love Sports...watching Football and Basketball with my hubby and boys is one of my favorite pass times.
  4. I've eaten Alligator before :) It was Alligator Linguine and it does not taste like Chicken.
  5. I HATE butter...I mean HATE..it makes me want to vomit
  6. I LOVE it when people play with my hair...LOVE it!
  7. I love watching the Jersey Shore and I'm so not ashamed to say..it's mindless entertainment that I enjoy
  8. I love the ocean but I hate to go in it..I'm actually a little scared...I got stung on my boob by a jelly fish in Maui and it hurt like H-E-Double Hockey Sticks
  9. I'm obsessed with little pink piglets..I think they're adorable and I want one.
  10. I'm a sucker for "As seen on TV" gadgets...there's some seriously good stuff out there LOL
  11. I'm a Licensed Hairdresser...my profession before my current one which is a Stay-At-Home-Mom
Now to answer the questions Emily has for me :)


1. What's your fondest high school memory?
Playing Softball...those were the best moments of high school, I'm still friends with most of those girls, we had some good times.
2. What's your favorite color?
Blue..but I love pink too
3. What do you pack in your kids lunch for school?
One kid is in only in Pre-K so no school lunch, and the other is in middle school and has decided hot lunch is the way to go :)
4. What's the most romantic thing your husband has ever done for you?
The way he proposed..stay tuned on my blog and I'll tell you all about it
5. Water or Milk and why?
Water! I hate milk...yucky
6. What's the craziest name you've ever considered naming your child and why?
I never had any crazy names...I like pretty traditional names to begin with
 
7. What's your favorite sports team and why?
Seattle Seahawks...it started out cause my husband was such a fan and has season tickets..I just fell in love with the team..been a huge fan ever sense.
 
8. What's your least favorite household chore?
Hmmm that's a toss up between Laundry and Emptying the Dishwasher...I'll have to go with Laundry cause it's more time consuming and cuts in to my craft time LOL :)
 
9. What's your favorite accessory?
I'm not a huge accessory kind of girl...I'd have to say my Diamond Earrings my hubby gave to me years ago.
 
10. Sandwich or bagel?
Sandwich...Turkey yummm or a French Dip! Or wait...a BLT..can you tell I'm hungry LOL!
 
11. Why do you blog?
 I blog because it's my outlet...the time where I get to express myself, show others how to make some crafty stuff, and meet new people.  I don't get out a lot and talking with other bloggers has been really nice for me.  I enjoy every minute of my blog...and I have to say, that receiving positive comments about my projects totally makes my day.

Well, that was fun!  I hope you enjoyed getting to know Me, Crafty Soccer Mom.  Thank you Emily for your questions, it was really fun!

Now Here are my 11 Questions for the bloggers of my choice:

  1. Whats the one crafting tool you can't live with out?
  2. If you could vacation anywhere in the world..where would you go?
  3. What's your favorite flavor of Ice Cream?
  4. What's your ideal date night?
  5. What was your favorite cartoon as a kid?
  6. What's a book that you loved that you would recommended to anyone?
  7.  Name 3 things that you love best about yourself
  8. Whats your all time favorite movie?
  9. Whats the first thing that attracted you to your husband/boyfriend?
  10. What's your favorite animal to see at the zoo?
  11. Do you have any tattoo's? 
 I'm tagging:
Jamie @ C.R.A.F.T.
Jamie @ Sew Rock'n
ChiWei @ One Dog Wolf
Ok...the others I was going to add have already been taken..so this is close enough :)
Alright ladies now you have to tell us 11 things about you and answer my 11 questions then tag 11 other bloggers and make up 11 questions for them to answer. Have a great day and hope you enjoyed finding out a little bit more about me. 

Have a great day!

Thursday, February 16, 2012

More Duct Tape Weave Bracelets

Memba this from last week?


The Duct Tape Woven Bracelet I made my oldest son...

Well I've been busy making more!  


That last one is doing it's job..it's camo and it's totally blending in LOL


The top one I used some Tie Dye Tape, the third one has some Butterfly Tape, and the last one has Hello Kitty Tape...


The top one I used some Paint Splash Tape, and the third one has the Purple Tie Dye tape in it.


Pretty Cool eh?
Clearly I love making these LOL..and I plan on adding them to my shop soon.

These pics aren't very good I'm sorry...
I feel like this is one of those things that I can say looks better in person :)

Any who, I just wanted to share what I've been up to...
Have a great day!

Duct Tape Watch


Howdy!
Ok Ok..so the watch isn't Duct Tape but the Watch Band is :)

This is such an easy project...seriously!  

This project can be for all skill types ;)


Fuzzy picture..my bad!
So you will need one of these watch faces...the kind with the loop on it that the arrow in the photo is pointing too.
I had this one at home, but you can purchase these at your local Craft Store...They have some awesome ones at Craft Warehouse for those of you that have that store in your area.


All you do is measure your wrist and make a Duct Tape Strip fit to size...
Now I made mine a Woven Duct Tape Strip..and I did this for two reasons
  1. It looks cool
  2. It makes for a thicker strap
But you don't have to do that...but I would suggest making your strap thick by adding a couple layers of Duct Tape....or even some of that thin flexible cardboard from the recycle bin.


I just added Sticky Back Velcro to mine...it was cheap, simple and quick.

AND...

The best part is...they are interchangeable! 
Like this..


Or


Or...


Seriously..does it get any cooler than that???

What a fun gift to give to someone...
A Watch with extra bands for every occasion!

There are tons..I mean TONS of colors and designs to choose from in the Duct Tape Department.

Get Creative With It!!!

Happy Crafting!

Wednesday, February 15, 2012

Disposable Drinking Cup


Hello!
So today I'm going to show you how to make this "one time use" disposable cup out of paper.

You may be wondering why on earth would I want to make this?
Well, here's my inspiration....My son.

He has to take medication and when he's away at a friends how or whatever, we always make sure he takes a water bottle...but then he has to carry it around..yadda yadda yadda..SO...

I figured if he could keep one of these little cups in his pocket or wallet, it'd be really easy for him to just go into the rest room and discreetly take his pills w/o a big fuss and he can just toss the paper cup in the garbage.

The cup is about the size of a shot glass, so it's like a one gulp cup.  However, you can make it bigger if you want.  

Let's get started!


Cut a piece of paper into a square...mine is 4 inches x 4 inches.
Now you can use card stock, printer paper, magazine pages...what ev...just make sure it's square.


Now fold it into a triangle...


Fold the bottom right corner over to the left as seen in picture...you'll know it's in the right spot when a perfect triangle is formed above where my finger is...


Now flip it over and to the same thing with the corner...


Ok..now pay attention here...So the top portion which is shaped like a triangle..the piece that my thumb is on towards the right of the pic..take one of the pieces and fold it into the side you folded over...
Does that make sense?? Look at the pic really well and it should make sense...it's really one of those things that's super easy...but hard to describe.


In this pic it shows the finished step that you just did..it should look like this... you've folded the top triangle down into the side triangle


Flip it over and tuck that top triangle down  into the triangle just like you did on the other side.
You're finished!


 It should take you under a minute to make this.


Of course I couldn't stop there...I covered it in Duct Tape for extra durability in your pocket...and it's totally waterproof, it won't leak.

I even made one totally out of Duct Tape, but it's not as thin as using paper.

So there you go!
Make one and tuck it in your wallet, you never know..it could come in handy.

Now for those of you that party like it's 1999...use it as a shot glass at a party. 

Or..make them on a bigger scale and put snacks in them for the kids..
popcorn, chex mix, crackers, candy..you name it. 

Have a totally awesome day 
and
Happy Crafting!

Monday, February 13, 2012

Paint Chip Napkin Rings


Hello Ladies!
While grocery shopping today, I picked up some paint chips.
I totally feel like I'm doing something wrong by taking paint chips but a girl has to do what a girl has to do :)

I decided to make Paint Chip Napkin Rings for tomorrows Valentine's dinner with the hubs and our boys.
This is SOOOOOOO easy..


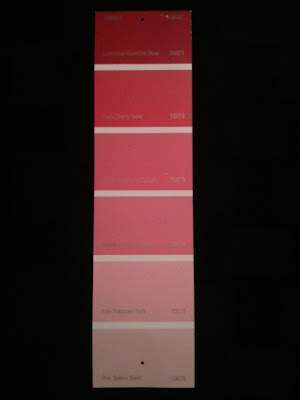
So here's the paint chips I chose..the long skinny ones.


I cut one square off and punched a hole towards the top. 
I then wrapped the bottom around and punched a hole directly where the top hole was.


I made a few hearts as decoration.
My original plan was to buy some of those big paper flowers with brads included but totally forgot.
The hearts will do :)


I attached a small brad in the middle of heart, and then put it in each of the holes in the paint chip.
Badda Bing Badda Boom! 
Done!!

You can really get creative with this....I decided to just use stuff around the house to save money...
but these would be super fun for any holiday or get together!

There are a lot of decorative brads out there to choose from...A LOT.
And if you don't feel like using brads another option would be to use your hot glue gun or use a sticker to keep the loop closed.

Happy Crafting!

Wednesday, February 8, 2012

Easy Cherry Cobbler


Need an easy dessert recipe???

WANT a tasty dessert recipe???

I have just the one for you....it's hot, sweet and tasty!

Cherry Cobbler

Here's what you need:


Two Cans of Cherry Pie Filling (or any other fruit flavor) 
1 Box of White Cake Mix
1 Stick of Butter
Slivered Almonds (optional)

Here's what you do:

Preheat oven to 375 degrees


Put room temperature butter and 1/2-3/4 of the cake mix into a mixing bowl.
Mix until it resembles crumbs..like shown in pic above.


Add both cans of fruit into a casserole dish (mine is 9x13)


Add the cake/butter mixture on top of the cherries.
I like to layer just enough to where I don't see the cherries anymore.
Which is why I don't use the whole package of cake mix, it's just too much.


Add slivered almonds...if you don't like almonds omit this step :)

Put in the oven for 30-45 minutes or until golden brown


Here it is....I know I know..it's fabulous..all bubbly and golden to perfection!

Now listen..it'll be difficult..but you must let it cool for a few minutes!
It comes out piping hot, and I speak from experience...waiting is best lol :)

This is a great dessert for these cold winter nights.  
Just toss it in the oven while you're eating dinner.

This would also be great for work potlucks, book clubs, etc...

Enjoy!