Tuesday, September 6, 2011

Sand Paper Printed T-Shirt

Sand Paper Printed T-Shirt

This is sooooo cool!

So I ran across this on Pinterest (totally and utterly addicted) 
Here is the link to the original tutorial on this project over at Alpha Mom

All you need is:
Sand Paper (fine is best) I got mine at Dollar Tree
T-Shirt
Color Crayons
Iron
Cardboard
Paper Towels


I found this boys X-Small Long Sleeved Shirt at the Dollar Store.
Along with the Sandpaper.


I wrote Jackson's name on the Sand Paper with Crayons.
You have to go over it several times and get the crayon on their nice and thick.

And then I realized...Oh wait, it's going to be backwards on the shirt...Ack!


So then I had to re-write his name but backwards..
and I got so caught up in writing backwards that I forgot to switch out color crayons for different colors.
UGH..Oh well :)  

Next I put some cardboard inside the shirt so the crayon wouldn't leak through to the back of the shirt.
I placed the Sand Paper upside down on the front of the shirt and placed two paper towels on top of the Sand Paper.

I ironed for about 30 seconds

I removed the Sand Paper, put the paper towels down on the image and ironed for just a few seconds to get any extra wax off the shirt.
Then you place it in the dryer for approx 20 minutes to set the color.
It is recommended to wash this shirt by itself the first time.


and I got this...Clearly I need to color on the sand paper a little more to get the image darker..however I do think this is a blast! It was super easy, quick and I am going to go try it again :)

I think I'll let my kids do the art work next time though :)
Once they do it, I'll post some pics.

On a totally unrelated topic..My oldest son started Middle School today..yeah Middle School.
I was up half the night due to nerves..I just can't believe my baby is so old..Check out this pic..


I tried getting a picture by the front of the school...yeah no dice..he wasn't having it lol :)

Apparently that is really embarrassing...

Good times :)

Hope you all have a fabulous day!

Friday, September 2, 2011

More Headband Designs

More Headbands...

Ok, remember my last post where I made this.....


Well in that post I mentioned that I wanted to make more to sell at my next craft show..

So I went to the Dollar Tree and I found some headbands..


7..yes 1..2..3..4..5..6..7.. headband for $1!!!  Whoooo Hoooo!
Now that's a bargain :)

These are really fun colors too..
Yellow, Light Green, Light Pink, Dark Pink, Light Blue, Purple, and Red

So I got to work making my Yo Yo Flowers and went to town, 
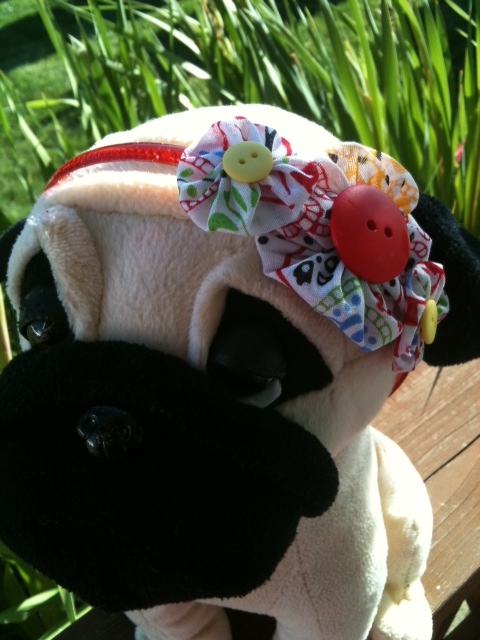
Here's what I came up with..I had to use my Pug Stuffed animal for these pics..
I have boys..no dolls around here!

Yellow Headband, with Blue Yo Yo's and Yellow Buttons


Purple Headband, with Purple Floral Yo Yo's, and Purple Buttons


My personal favorite
Light Green Headband, with Pink Floral Yo Yo's and Pink Buttons


Red Headband, with Spanish Style Print Yo Yo's with Red & Yellow Buttons


Light Pink Headband, Pink Yo Yo's with White Buttons


My Second Favorite
Light Blue Headband, Polka Dot Yo Yo's with Blue Buttons

So what do you think?  Pretty cute eh? 
I wish you could see them in person cause they are WAY adorable!

Have a great night!

Wednesday, August 31, 2011

Headband

Headband

Yo Yo Yo Ladies!
How's your day going? 
How's mine you ask..well not the best but I did get to make something today so that brightened up my day!

So I just needed to do something that I didn't have to think too much about and so this is what I made this morning :)


I've had these super skinny plastic headbands For..evvvv..errrrr (for all you Sandlot fans lol)
I never wear them..ever..yet I still kept them like any true hoarder crafter would do..

SO..I made up some Yo Yo Flowers ( Tutorial HERE )
With the same Polka Dotted Fabric I've been using forever
I think it's time for some new prints...Oooh a reason to go shopping...wait I don't need a reason do I?

But I digress..


I made one larger Yo Yo Flower and then two small ones to go on either side
Hot glued them to the skinny headband, threw my hair up in a messy bun like every other day and called it good.

I wear my hair up A LOT..so much so that a good friend of mine said to me yesterday as she walked up from behind me "Oh, I didn't recognize you with your hair down"..Yeah that's a problem LOL
Ugh, who has the time? Not me..or maybe I just don't really care? 
I mean, who wants to get hot glue stuck in their hair? Um..not me..it's all about safety folks :)


Close Upppppppp

The fabric has purple, blue and black polka dots so I did a button in each color on the black headband.

I'm thinking about buying some headbands and making some more of these to sell at my craft bazaars I do...they're fun to make and rather easy.
I'm thinking about hitting up the local Dollar Store and getting a 5 pack of different colors...and...I realize I am now rambling...

I'm ready for bed....LOL..if only my kids were! Can I get an Amen?!

Have a good night everyone!

Tuesday, August 30, 2011

T-Shirt Scarf #2

Upcycled T-Shirt Scarf


So here is another way to make a beautiful Scarf out of an old T-Shirt :)

In this case I used one of my oldest son's old T-Shirts...The bigger the T-Shirt the longer the scarf.
My son is 11yrs old, so the shirt wasn't that big, but it still makes a long scarf and I was able to double it up.

So let's get started eh....


First you lay the T-Shirt down flat, and then you cut off the hem at the bottom. 
Next you cut thin strips (not too thin, about 1/2"-1") all the way across the T-Shirt to make big loops.


Next, stretch out each hoop and then wrap it around your hand to form small circles like above.
You can make them as big or small as you like.


With the remaining T-Shirt scraps, cut strips about 2-3" long..this material stretches remember.
Next lay your hoops side by side and tie them together with your strip of T-Shirt.


And this is what you get...You can either leave it open at the end..or tie it together like I did to make one big loop. Now you need to trim off the excess T-Shirt from the knots you tied with the strips of fabric.


Isn't that adorable?! SO easy and fun :) I love it!
Next time I will try it with a bigger shirt so I can make it longer, but I will definitely sport this one.

Hope you enjoyed this tutorial on how to make another type of T-Shirt Scarf
Have a great day!

Monday, August 29, 2011

I was featured

Hey Guys!
Yesterday I was contacted by Amanda from Fun Family Crafts asking me to join and submit my Monster Popsicle Snuggies :)


How exciting!  I had never heard of Fun Family Crafts before and boy was I excited when I went over to visit, there are so many neat submissions to look through. 

Go check them out HERE and take a look at my Monster Popsicle Snuggies and all the other good stuff posted by talented crafters, you'll love it I promise!

Also...


She took a liking to my Button Tree Art :) Thank you for the shout out!!

Go check her blog out, it is super fun, and she won't disappoint!
She has fabulous Linky Parties and makes lots of neat stuff :)

Alright Ladies & Gents, that's all for today.  Have a fabulous night!

Friday, August 26, 2011

Shadow Box Bank

Shadow Box Bank

So this is so not complex that I only have two pics...

The result is so much fun though!


I bought a 5x7 Shadow Box at Michaels
It's really wide so it can stand up on it's own, and doesn't have to be mounted on the wall


I printed off a Super Mario Bros pic size 5x7 and glued it to the inside of the back part of the frame.

Then I cut a hole with my craft knife for the money to go through

And DONE! Isn't that cool, so as if fills up you can see all the money you have in it :)  If you look close you can see some change I put in it on the bottom.

This one is for my youngest son, but I am going to make another one with a different image for my oldest.

You can totally personalize this for anyone, put their favorite sports team, cartoon, college, etc..Have fun with it!

Have a great night!

Thursday, August 25, 2011

A-Z

A-Z


Hey guys, I saw this post on this new blog I started following called C.R.A.F.T.

Thought I'd do it too, and share a little bit about myself :)


A. Age: 32

B. Bed Size: Queen

C. Chore you hate: Emptying the dishwasher..hate it!

D. Dogs: I have one adorable Pug named Obi

E. Essential start to your day: A shower, I can't function w/o showering first

F. Favorite Color: Ultimately it's blue, but I also love pink

G. Gold or Silver: Silver..Unless it's White Gold

H. Height: 5'1..I'm a shorty :)

I. Instruments you play: None, although I hope to take guitar lessons soon

J. Job Title: Slave Stay At Home Mom

K. Kids: I have two boys ages 4 and 11 yrs old..LOVE THEM!

L. Live: Troutdale, Oregon

M. Maiden Name: Zollitsch....Yeah go ahead and try to pronouce that!

N. Nicknames: Nic & Nikki

O. Overnight Hospital Stays: Twice for giving birth and once for surgery

P. Pet Peeve: Honestly I have a ton..but here's one...hearing people chew 
food...GROSS

Q. Quote: Things happen for a reason

R. Righty or Lefty: Righty, but I do some things with my left..weird I know

S. Siblings: I have one little Sister

T. Time you wake up: Everyday I'm up by 6:15-6:30am

U. University Attended: None..went to Community College and Beauty School

V. Vegetables you dislike: I hate CANNED vegetables..gross..Fresh is best baby!

W. What makes you run late: Nothing..I have a fear of being late so I'm very early to everything

X. X-rays you've had: Dental, Jaw, Leg, Stomach...I think that's it

Y. Yummy Food: My favorite foods are Pineapple, Mexican food (YUM), Caramel, and Cheesecake

Z. Zoo Animal Favorite: The Cats..they are such strong gorgeous animals...although Monkey's are a close second


Alrighty guys, there's a little bit of useless info about Crafty Soccer Mom :) 

If you put this up on your blog let me know, I'd love to hear more about you as well.

If you haven't followed me via Google Friend Connect, please do, and I'd love to follow you back.

Have a great night!