Wednesday, September 14, 2011

Origami Paper Bookmark

Origami Paper Bookmark


Here is a tutorial on how to make this VERY simple corner bookmark out of paper.  
They are so much fun and this is easy for kids to make too :)

The one above I made to look like The Angry Bird...isn't it cute!?


Close up of the bird...cause the birds the word


Here's the back...or it could be the front..totally up to you....10 points if you can guess which book this is!

Ok here's how you can make your very own book mark.
I took step by step photos, so let's get started shall we..


You will need a square piece of paper...this one is 6x6..the bird was 7x7
You can make this as big or small as your little heart desires..however I suggest starting with a big piece of paper the first time just so it's easier to fold till you get the hang of it.


Fold the paper in half to form a triangle...


Now take the right corner and fold it up to the center point of the triangle..and the left corner and fold it up so that now you have a square..


Unfold the last step..now take the top part of the triangle and fold down to the center...leaving the back side alone.


Now take the right side and fold it up behind the white piece..and then do the same for the left side...
Still with me?  See in the right orange piece?  The rest of it is tucked behind the white triangle.


Now that you have both sides tucked in you are all done!


Slip the page in there and your good to go. 
This can be the front or....


This can be the front...up to you..to each his own.


Yup..I'm a goober, totally spelled my blog name wrong..it's one of those days lol!

You can decorate with stickers, jot down notes from your book, reminders, decorate with markers...
the list goes on and on.

Have fun with your bookmarks, get your creativity on!

Happy Crafting!

Saturday, September 10, 2011

Duct Tape Mouse Pad

Duct Tape Mouse Pad


The Hubs bought me this super cute little wireless pink mouse for my laptop..Isn't it cute?!

So yeah..I could go out and buy a cheap mouse pad..but that's just not my style...
Instead I grabbed some carboard, duct tape, clear contact paper and a pig sticker and made..

This cute little number!  Sorry the pic is dark..the sun is going down so I lost all my natural light..


After adding Duct Tape to my Cardboard I put this cutie little piggy sticker on.
Then added my Clear Contact Paper over the top to add smoothness for my pretty little mouse to glide over.


This is one of those projects that I wish you could see in person cause it looks so much better..oh well..you get the general idea :)  And looking at this pic my sticker looks uneven..drats!

All in all, it took me minutes, it matches my mouse and I am pretty happy with it...I even got a two thumbs up from my oldest son (he's so good to me!)

Have a good night!

&

Happy Crafting!!

Duct Tape Key Wristlet

Duct Tape Key Wristlet


At this point most of you realize my love for Duct Tape

I am always looking for new things to make using Duct Tape and last night this came to me..
a wristlet so it's easier to hold onto my keys


I don't know if  "wristlet" is the correct word for it, but it's what came to mind :)


This is really simple to make..
I just used Duct Tape and a Key Ring (clip optional)

Measure out 12" of Duct Tape (or longer if you want)
Fold the tape towards the middle hot dog style
Then fold the other side the same but over lap the tape a little so that there is so sticky on the tape
You should now have one 12" long strip of Duct Tape w/o any sticky showing

Make a loop with the Duct Tape and put the two end pieces thru the key ring, wrap around and secure with a strip of tape.

DONE!

It takes just minutes.

Hope you enjoyed another one of my Duct Tape crafts :) 

I just wanted to give a little shout out to Rachel over at
Her blog is awesome and she is super duper nice..if you have small children you should really go check out her blog.  She has some fabulously fun things to do with your kiddos..you'll love it :)

Happy Crafting!

Have a fabulous day!


Thursday, September 8, 2011

Indoor "Sand Box"

Indoor "Sand Box"


I posted this on Facebook last year and my friends LOVED it, so I thought I would share it with you :)

All that is needed is this project is uncooked rice...and a big plastic tote.

I like the flat ones that people use for wrapping paper but you can use anything.

I've also used this:


Today I used a smaller Tupperware container...I like to shake things up..


I gave him a funnel and he put his cars in there..and was actually quiet for like 15 minutes..
that is a REALLY long time for him lol :)


This is last year..I used two huge disposable foil pans from the Dollar Tree..which worked out GREAT!
I gave them sand toys, kitchen measuring cups, and funnels and they had so much fun.

I don't know when the last time you stuck your hand in a pile of uncooked rice was...but it feels FANTASTIC!

I mean that's why so many people use rice as sensory boxes for little kids, the rice feels so soothing when it drops through your fingers...

You can do this outside as well, that's why I like the big long tote, it comes with a lid.
You can fill it up with beans, rice, small rocks or sand. 

We love filling up the totes with mini pebbles too..Jackson put all his construction hot wheel's in there and played with that a lot.

Have a fantastic day!

Wednesday, September 7, 2011

Duct Tape Ring

Duct Tape Ring

Hello!

Hello!

Hello!

Today I made a Duct Tape Ring for the first time :)

You know me and Duct Tape! 

Here are some pics of the finished product...


This is Stage 1 of the ring...It was cute..but I wanted it a little fuller...
P.S. My hands look so wrinkly..ewwww

It was right before this Stage that my youngest son decided to take my brand new can of hairspray and spray it all over his toys in his bedroom..Yeah..good times! 

On to Stage 2...


I like this fuller look better..don't you?

This is ALL Duct Tape..even the band :)


So stink'n cute! 

Ok I have to be honest..I made a ring right before this one..and it was UGLY..
It was way too big and I tossed it in the garbage half way thru the process.
My oldest son thinks I'm nuts when I throw things away..but hey..for me it's out of sight out of mind.
And it was seriously awful!

Speaking of Duct Tape..
I had a Girls Night a few days ago and I used Duct Tape in my decorations..


I wrapped Pink Polka Dot Duct Tape around the water bottles!


Closer look...

Ok..

Time for a shout out about Child #2..today was his first day of Pre-School..


It's a little fuzzy cause the kid never stops moving...but at least I got a pic!
He had a great first day back at school and can't wait to go back.

Thanks guys :)

Have a great day!

Tuesday, September 6, 2011

Sand Paper Printed T-Shirt

Sand Paper Printed T-Shirt

This is sooooo cool!

So I ran across this on Pinterest (totally and utterly addicted) 
Here is the link to the original tutorial on this project over at Alpha Mom

All you need is:
Sand Paper (fine is best) I got mine at Dollar Tree
T-Shirt
Color Crayons
Iron
Cardboard
Paper Towels


I found this boys X-Small Long Sleeved Shirt at the Dollar Store.
Along with the Sandpaper.


I wrote Jackson's name on the Sand Paper with Crayons.
You have to go over it several times and get the crayon on their nice and thick.

And then I realized...Oh wait, it's going to be backwards on the shirt...Ack!


So then I had to re-write his name but backwards..
and I got so caught up in writing backwards that I forgot to switch out color crayons for different colors.
UGH..Oh well :)  

Next I put some cardboard inside the shirt so the crayon wouldn't leak through to the back of the shirt.
I placed the Sand Paper upside down on the front of the shirt and placed two paper towels on top of the Sand Paper.

I ironed for about 30 seconds

I removed the Sand Paper, put the paper towels down on the image and ironed for just a few seconds to get any extra wax off the shirt.
Then you place it in the dryer for approx 20 minutes to set the color.
It is recommended to wash this shirt by itself the first time.


and I got this...Clearly I need to color on the sand paper a little more to get the image darker..however I do think this is a blast! It was super easy, quick and I am going to go try it again :)

I think I'll let my kids do the art work next time though :)
Once they do it, I'll post some pics.

On a totally unrelated topic..My oldest son started Middle School today..yeah Middle School.
I was up half the night due to nerves..I just can't believe my baby is so old..Check out this pic..


I tried getting a picture by the front of the school...yeah no dice..he wasn't having it lol :)

Apparently that is really embarrassing...

Good times :)

Hope you all have a fabulous day!

Friday, September 2, 2011

More Headband Designs

More Headbands...

Ok, remember my last post where I made this.....


Well in that post I mentioned that I wanted to make more to sell at my next craft show..

So I went to the Dollar Tree and I found some headbands..


7..yes 1..2..3..4..5..6..7.. headband for $1!!!  Whoooo Hoooo!
Now that's a bargain :)

These are really fun colors too..
Yellow, Light Green, Light Pink, Dark Pink, Light Blue, Purple, and Red

So I got to work making my Yo Yo Flowers and went to town, 
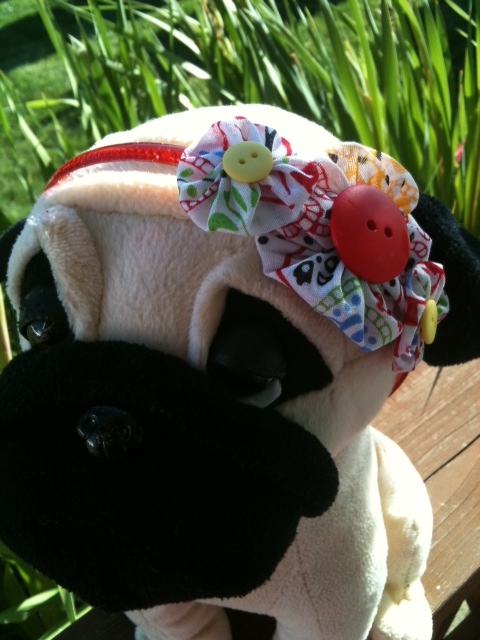
Here's what I came up with..I had to use my Pug Stuffed animal for these pics..
I have boys..no dolls around here!

Yellow Headband, with Blue Yo Yo's and Yellow Buttons


Purple Headband, with Purple Floral Yo Yo's, and Purple Buttons


My personal favorite
Light Green Headband, with Pink Floral Yo Yo's and Pink Buttons


Red Headband, with Spanish Style Print Yo Yo's with Red & Yellow Buttons


Light Pink Headband, Pink Yo Yo's with White Buttons


My Second Favorite
Light Blue Headband, Polka Dot Yo Yo's with Blue Buttons

So what do you think?  Pretty cute eh? 
I wish you could see them in person cause they are WAY adorable!

Have a great night!