Showing posts with label Jewelry. Show all posts

Wednesday, April 25, 2012

DIY Star Earrings


I'm baaaaaaack!
Thank goodness!  Being without a computer is the pits!!!

Today I'm going to show you how to make these easy peasy Star Earrings.
They are super duper inexpensive too...which is always a plus right ladies?!

I came up with this idea just out of the blue...one of those Ah-Ha moments.
I love how they turned out :)

All you need is:
Wire (I used 24 gauge because that's what I had on hand)
Tube like seed beads (I don't know the technical name for them)


Cut a piece of wire about 4.5 inches long


Pick out 10 of the tube beads
Mine are glass but plastic is fine too


Put a bead on and then bend one end leaving about 1-1.5 inches at the top


Add your second bead right up against the first, then bend to a triangle shape


Add another bead right up against the previous bead THEN bend
Keep repeating this process


When you make it back around to where you started, after all 10 beads are on, take the two ends of wire and twist them together
Don't worry if your star is losing it's shape a little, it's easy to bend it back into shape


Warning!  If you twist too much, you will put too much pressure on your beads and if they are glass they will break
You could also make it too tight to where it's hard to keep your star shape
So just enough twist to keep them together


Trim any excess wire and then with your needle nose pliers make a loop


Add your earring wires and you are finished!

This is so easy, and it only takes a minute to make.

You can use all one color of bead or mix it up with a variety of colors.
These beads are super cheap, and light weight.

Make earrings or use them as a necklace charm.

Have a great day
and 
Happy Crafting!

Tuesday, April 10, 2012

Baseball Bracelet Tutorial


I received a request from Owl Make it 4 you, to do a tutorial on how to make my Duct Tape Baseball Bracelet.

So Owl Make it 4 You...this one's for you!

Let's get started shall we...


You will need White Duct Tape and Red Embroidery Thread
If you are making this for Softball, use Yellow Duct Tape


I used a 1/8" Hole Punch
If you don't have one this small, you can make this using a Regular Hole Punch and Red Yarn.


Cut 2 strips of Duct Tape to 6 inches


Next fold over each piece in half, so that there is NO sticky present.
Tip: Start in the middle of the Duct Tape and work your way to each side so the fold is perfect.
If you still have some sticky showing around the edges, don't worry about it, we'll trim it later.


Next cut some holes with your Hole Punch.
Make sure your holes are along the folded side of the DT.
You can measure so they are exact or just eye ball it.


Next use a piece of tape to hold down the two strips in place, and start lacing the Embroidery Thread.


When you lace, you want to go under, and bring the thread up thru from the back as you criss cross.
An easy way to do this is, put the left thread under the right strip...take your right string and go under and out on the left side. Then take left string and bring it up thru the right side. 
If this is too confusing, refer to the picture.


Tie a loose not in the back and cut the thread.
You can see in this pic that I didn't use my last hole, that's because I didn't mean to Hole Punch that spot yet, because I need to use that for my end thread.  No worries, I can fix that in a minute.


Now cut one more 6 inch strip of Duct Tape and gently place your threaded strip on top.
Press down and smooth it out.
Now I just re-punched those holes on the left and punched some on the right.
Next I trimmed around all the edges, and rounded the corners.
You can keep the bracelet wide or trim it closer to the thread. 
Make sure you don't cut it right up next to the thread, leave some room.


Cut two long pieces of Embroidery Thread
Put the thread thru and tie a not in the back.


Here's the back

If you have any questions please feel free to email me.
This is actually very easy, however it always seems the easiest projects are the hardest to put into words when it comes to a tutorial :)

Owl Make it 4 You...I hope this was helpful and thank you for requesting this tutorial.

Have a great day
and
Happy Crafting.

Wednesday, April 4, 2012

Duct Tape Feather Earrings


Today I've been working on Duct Tape Feather Earrings!!

Here's a tut on how to make them :)


I made a 4 in x 2 in strip of Duct Tape Fabric
Duct Tape Fabric: A piece of DT on top of another piece so no sticky is present.

I printed off a Feather to use as a template, but you can just free hand it if you want.

Trace onto Duct Tape with a pen.


Now cut it out.
Tip: If there is any pen marks still on your DT from when you traced, use a baby wipe to wipe it off.


Next cut little slits into the side of the feather at an angle.
When that is done, every few slits, cut the corner off the right side.

Now holding both ends of the feather, twist gently in opposite directions to give it an organic look and spread out some of the feathers slits along the sides.


I used one of these finding clamps...can't think of what they are called.
I cut some of the end off the stem, laid it in the clamp, and then clamped it in.


Last step, add an earring hook.  Done!

You can also add some chain to it so it hangs longer, with maybe a couple feathers attached.
Or put it on a necklace.

Enjoy!

Happy Crafting!

Friday, March 23, 2012

Nursing Bracelet


This is my newest addition to my Etsy Shop!

It's called a Nursing Bracelet.

Perfect for new Mom's, and a gift they will thank you for!

I only have one in my shop right now, but will have more with in the next couple of days.


So go read all about my Nursing Bracelet, what's it's for, how it works..you know all the deets.

I'm off to the beach for the weekend, it's Spring Break Baby!

Psst...hey you...Yeah you!
Did you notice some changes to my blog??

Have a great weekend everyone!

Thursday, March 22, 2012

Phone Number Bracelet


Today I am bringing you The Phone Number Bracelet

Why you may ask?

Well Spring Break starts for us this weekend, and Summers right around the corner.
Families travel, kids are running a muck in the neighborhood, you're at the park, picnics, play dates..
yadda yadda yadda.

If your kids get lost and/or need to remember their phone number, 
this bracelet is perfect!

And Yes I totally used the infamous phone number from the 80's!


You can thank me later for getting this song stuck in your head...
ain't I a stinker!
 
Now I made mine on Stainless Steal Memory Wire...BUT
you don't have to.  If your kid is running around or you're at Disney Land..you're going to want something that will have zero chance of falling off so be thinking of that when  you make your bracelet.

Here are some other suggestions, either putting the numbers/beads on ribbon or string and tying it, or making it into a charm bracelet with a metal clasp, a necklace or even string the numbers on their shoe laces.

What ever your heart desires.  This could be a fun project for the kids, and they can design it themselves.

Safety First!

Have a great day 
and
Happy Crafting!


Wednesday, March 21, 2012

Hair Vine


I've been wanting to make one of these Hair Vines for some time...so today I did.

Now..Keep in mind this is my FIRST attempt, so it's not the best.
My next one should be better...fingers crossed.

Now if you haven't heard of Hair Vines...let me give you the skinny.

They are typically used for Weddings or Proms..things of that nature.  For Wedding use, they are typically longer than the one I made and used in place of a Tiara.
I know I know...who could replace a Tiara!


But I promise they are just as exciting and gorgeous as a Tiara!


On each end is a loop to place your Bobby Pins so the Hair Vine stays in place.

Mine is about 4 in long and would be cute on the side of your hair, or on the outside of an Updo.
I would've shown you but I am a dork when it comes to these types of things and I can't do it myself...
What? I live in a house full of boys! 
 LOL :)


I like this shorter version, because it's great for every day use.
But here's the kicker..
Make it fancier for that special event by using Swarovski Crystals and Pearls OR keep it simple for an everyday look.  They are very organic and pretty looking, and are customizable to your favorite color/style.

I will for sure be making more of these!

Have a great day
and 
Happy Crafting!!

Tuesday, March 20, 2012

Rhinestone Stud Earrings


Like a Rhinestone Cowboy.....sorry that song totally just popped into my brain LOL!

I made these super D-duper cute stud earrings today!

And..

I'd like to show you how I did it.  

Here are the two items you will need to make these AWESOME stud earrings...


Rhinestones that are flat on the back (No sticky and/or self adhesive)
and
Stud Earring Findings

Bam!

So now you glue the Rhinestones onto the earrings...wait...wait....wait..Ok now they should be ready!

And sport those babies like nobodies business!

Make them for your daughters, or someone else's daughters, for your niece, for your neighbor 

OR..

Just make them for yourself!

OR...

You can order them from My Etsy Shop!


Have a great day 
and 
Happy Crafting!!


Monday, March 12, 2012

St. Patricks Day Necklace


Hello!
Today I'm showing you this St Patrick's Day Necklace I made :)

It was a super fast project and very inexpensive as well!


I had these glass rocks from the Dollar Store..you know the ones that are flat on one side?
A lot of people make refrigerator magnets out of them.

I made two necklaces different ways:
Way one:


I put a Clover Sticker onto a piece of green printed paper.
Then I put some Diamond Glaze on the back of the Glass Stone, and placed it on top of the sticker/paper.
I let it dry and then cut around the stone, getting rid of the excess paper.
I added some Diamond Glaze to the back of the paper too, let it dry.
I then glued on a jewelry bail with E6000 and it was done!

Way Two:


I glued the green paper to the back of the stone, but placed the sticker directly on top of the stone on the front side.
The reason for placing the colored paper behind is, if you leave it clear you can see the bail through the stone and it looks ugly..in my opinion.

So now I have a cute little necklace to wear on St. Patrick's Day so my two annoying adorable son's don't pinch their mother!
I'm sure they'll do it any way LOL :)

Have a great day
and
Happy Crafting!

Monday, March 5, 2012

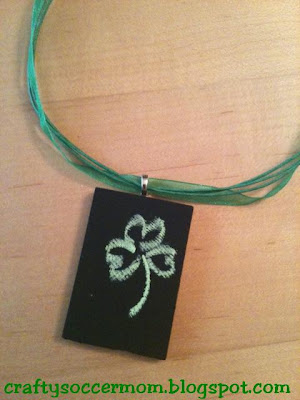
Chalkboard Necklace


Here is a super cute, inexpensive, easy and fun craft  :)

Here's what you need:
Little Wood Shapes (Square, Rectangle, Heart, Circle, etc) from the wood section of your Craft Store
Jewelry Bail
Necklace (Yarn, Hemp, Chain, Ribbon, etc)
Chalkboard Spray Paint
Chalk :)


Step one:
Lay down some newspaper outside and spray your wood pieces. The one I'm using is a rectangle, it's about 2"x1.5".  I have also used the hearts, those are adorable.
I spray two coats, it dries pretty quickly.


Step 2:
After the paint is dry, glue on your bail to the back.  
I like to use E6000 glue for gluing on bails.


Step 3:
Add your necklace and color on your new Chalkboard Necklace!

I chose to use a St Patrick's Day theme, I don't want to get pinched!

This is so much fun for kids, you can change it up everyday, or for each holiday.
Put your initial on it, a smiley face, your favorite jersey number...the list goes on and on.

The wooden pieces are super cheap, a package is usually under a dollar and you get several pieces in the package depending on what shape you choose.

The brand of Chalkboard Spray Paint I used was: 
Rust-Oleum Black Chalkboard Spray Paint

Here are a couple other projects I've posted on my blog in the past using this spray paint:


You could also glue a magnet to the back  instead of the bail and make it a refrigerator magnet instead of a necklace!
Have a great day 
and 
Happy Crafting!

Saturday, January 28, 2012

Bracelet

Yesterday I was out shopping with my oldest son and we stopped by Old Navy...

I saw on their jewelry rack that there was a ton of stuff on clearance....as I started going through all the stuff that was well deserving of a clearance rack...I found a hidden jem!

A horrible necklace with tarnished gold seed beads and some beautiful glass beads.  I had to get it..simply for the glass beads that were on it.  Beads are spendy and finding an ugly piece of jewelry that you can take apart to make new gorgeous jewelry is the way to go.

Now I apologize for not taking a "before" pic...I totally spaced it.  I was just too excited to cut it apart.

But here is the "after"


It's bright, chunky, and full of flair.  I freak'n love it!

I put the beads on stainless steal memory wire :)

So I encourage you ladies to hit up those clearance racks and see what you can find...charms, beads, earrings, feathers...you name it.  It can be a fun challenge, a great way to save money and it gets those creative juices flow'n!

Happy Crafting!

Saturday, January 21, 2012

Washer Necklace Upgrade


Good Morning!

So yesterday I had so much fun with this project and I can't wait to share it with you.
For a few years now I've been making jewelry out of washers...


Like this one here I made last year 

Washers are awesome because they are easy to find at your home improvement stores and they are cheap.  Not to mention there are a lot of things you can do with them.

Such as..Paint them with Nail Polish!
Yep..Nail Polish, it's that easy.

I grabbed a bottle at the Dollar Store yesterday..Hot Pink...cause who doesn't love Hot Pink???
I know in this pic it looks red, but it's pink.

The Washers I picked up at Walmart, but you can get them at any hardware store.  They cost me $0.99 for a bag of 33 (3 1/16").  The bigger ones are usually 4 for $1.
So I coated a Washer with Nail Polish..I dipped the brush in the bottle and then put a nice big dollop of polish on the washer and gently moved it around.
It was actually a lot of fun cause I love painting..who doesn't right?

After it dried, I applied a generous second coat.  I realized it wasn't necessary but it doesn't hurt.

After I painted the big Washer, I painted all these little tiny washers.

When all of them were dry, I added a layer of Quick Dry Top Coat to all the washers.
They dry rather fast...faster than I thought they would.  However, this would be a great thing to do the night before and let them dry over night.
I'd say mine dried within an hour..give or take.
I also got a bit impatient and used a hairdryer on them :) 

Here they are all shiny and dry...So adorable!!!


I made this necklace out of the little Washers


And I made this one out of the larger washer.  I added a bail to back using E6000 and added a chain to it.
This is my favorite...I really love this.  It's super shiny and bright. 
I've seen similar necklace selling for a ton at stores.

You can make so many things with this..Earrings, Bracelets, Necklace, Key Chains..you name it.

The kids can even do it!  This would be a fun project for a sleep over or birthday party.
You can mix Nail Polish Colors for a swirl or tie dye effect, or use Glitter Polish.

Have a great day ladies!
Happy Crafting!