I received a request from Owl Make it 4 you, to do a tutorial on how to make my Duct Tape Baseball Bracelet.
So Owl Make it 4 You...this one's for you!
Let's get started shall we...
You will need White Duct Tape and Red Embroidery Thread
If you are making this for Softball, use Yellow Duct Tape
If you are making this for Softball, use Yellow Duct Tape
I used a 1/8" Hole Punch
If you don't have one this small, you can make this using a Regular Hole Punch and Red Yarn.
Cut 2 strips of Duct Tape to 6 inches
Next fold over each piece in half, so that there is NO sticky present.
Tip: Start in the middle of the Duct Tape and work your way to each side so the fold is perfect.
If you still have some sticky showing around the edges, don't worry about it, we'll trim it later.
Next cut some holes with your Hole Punch.
Make sure your holes are along the folded side of the DT.
You can measure so they are exact or just eye ball it.
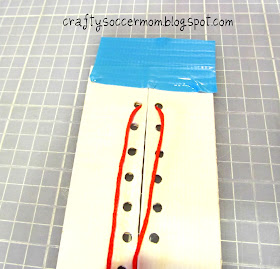
Next use a piece of tape to hold down the two strips in place, and start lacing the Embroidery Thread.
When you lace, you want to go under, and bring the thread up thru from the back as you criss cross.
An easy way to do this is, put the left thread under the right strip...take your right string and go under and out on the left side. Then take left string and bring it up thru the right side.
If this is too confusing, refer to the picture.
Tie a loose not in the back and cut the thread.
You can see in this pic that I didn't use my last hole, that's because I didn't mean to Hole Punch that spot yet, because I need to use that for my end thread. No worries, I can fix that in a minute.
Now cut one more 6 inch strip of Duct Tape and gently place your threaded strip on top.
Press down and smooth it out.
Now I just re-punched those holes on the left and punched some on the right.
Next I trimmed around all the edges, and rounded the corners.
You can keep the bracelet wide or trim it closer to the thread.
Make sure you don't cut it right up next to the thread, leave some room.
Cut two long pieces of Embroidery Thread
Put the thread thru and tie a not in the back.
Here's the back
If you have any questions please feel free to email me.
This is actually very easy, however it always seems the easiest projects are the hardest to put into words when it comes to a tutorial :)
Owl Make it 4 You...I hope this was helpful and thank you for requesting this tutorial.
Have a great day
and
Happy Crafting.


I did something similar to this, but I didn't make it into a bracelet. I made an iPhone Case with it. :)
ReplyDeleteThanks so much for the instructions. I made baseball bracelets for my son's 5th birthday party using white craft foam and plastic lacing. Thanks for the tips though!
ReplyDelete