Pages

Wednesday, August 31, 2011

Headband

Headband

Yo Yo Yo Ladies!
How's your day going? 
How's mine you ask..well not the best but I did get to make something today so that brightened up my day!

So I just needed to do something that I didn't have to think too much about and so this is what I made this morning :)


I've had these super skinny plastic headbands For..evvvv..errrrr (for all you Sandlot fans lol)
I never wear them..ever..yet I still kept them like any true hoarder crafter would do..

SO..I made up some Yo Yo Flowers ( Tutorial HERE )
With the same Polka Dotted Fabric I've been using forever
I think it's time for some new prints...Oooh a reason to go shopping...wait I don't need a reason do I?

But I digress..


I made one larger Yo Yo Flower and then two small ones to go on either side
Hot glued them to the skinny headband, threw my hair up in a messy bun like every other day and called it good.

I wear my hair up A LOT..so much so that a good friend of mine said to me yesterday as she walked up from behind me "Oh, I didn't recognize you with your hair down"..Yeah that's a problem LOL
Ugh, who has the time? Not me..or maybe I just don't really care? 
I mean, who wants to get hot glue stuck in their hair? Um..not me..it's all about safety folks :)


Close Upppppppp

The fabric has purple, blue and black polka dots so I did a button in each color on the black headband.

I'm thinking about buying some headbands and making some more of these to sell at my craft bazaars I do...they're fun to make and rather easy.
I'm thinking about hitting up the local Dollar Store and getting a 5 pack of different colors...and...I realize I am now rambling...

I'm ready for bed....LOL..if only my kids were! Can I get an Amen?!

Have a good night everyone!

Tuesday, August 30, 2011

T-Shirt Scarf #2

Upcycled T-Shirt Scarf


So here is another way to make a beautiful Scarf out of an old T-Shirt :)

In this case I used one of my oldest son's old T-Shirts...The bigger the T-Shirt the longer the scarf.
My son is 11yrs old, so the shirt wasn't that big, but it still makes a long scarf and I was able to double it up.

So let's get started eh....


First you lay the T-Shirt down flat, and then you cut off the hem at the bottom. 
Next you cut thin strips (not too thin, about 1/2"-1") all the way across the T-Shirt to make big loops.


Next, stretch out each hoop and then wrap it around your hand to form small circles like above.
You can make them as big or small as you like.


With the remaining T-Shirt scraps, cut strips about 2-3" long..this material stretches remember.
Next lay your hoops side by side and tie them together with your strip of T-Shirt.


And this is what you get...You can either leave it open at the end..or tie it together like I did to make one big loop. Now you need to trim off the excess T-Shirt from the knots you tied with the strips of fabric.


Isn't that adorable?! SO easy and fun :) I love it!
Next time I will try it with a bigger shirt so I can make it longer, but I will definitely sport this one.

Hope you enjoyed this tutorial on how to make another type of T-Shirt Scarf
Have a great day!

Monday, August 29, 2011

I was featured

Hey Guys!
Yesterday I was contacted by Amanda from Fun Family Crafts asking me to join and submit my Monster Popsicle Snuggies :)


How exciting!  I had never heard of Fun Family Crafts before and boy was I excited when I went over to visit, there are so many neat submissions to look through. 

Go check them out HERE and take a look at my Monster Popsicle Snuggies and all the other good stuff posted by talented crafters, you'll love it I promise!

Also...


She took a liking to my Button Tree Art :) Thank you for the shout out!!

Go check her blog out, it is super fun, and she won't disappoint!
She has fabulous Linky Parties and makes lots of neat stuff :)

Alright Ladies & Gents, that's all for today.  Have a fabulous night!

Friday, August 26, 2011

Shadow Box Bank

Shadow Box Bank

So this is so not complex that I only have two pics...

The result is so much fun though!


I bought a 5x7 Shadow Box at Michaels
It's really wide so it can stand up on it's own, and doesn't have to be mounted on the wall


I printed off a Super Mario Bros pic size 5x7 and glued it to the inside of the back part of the frame.

Then I cut a hole with my craft knife for the money to go through

And DONE! Isn't that cool, so as if fills up you can see all the money you have in it :)  If you look close you can see some change I put in it on the bottom.

This one is for my youngest son, but I am going to make another one with a different image for my oldest.

You can totally personalize this for anyone, put their favorite sports team, cartoon, college, etc..Have fun with it!

Have a great night!

Thursday, August 25, 2011

A-Z

A-Z


Hey guys, I saw this post on this new blog I started following called C.R.A.F.T.

Thought I'd do it too, and share a little bit about myself :)


A. Age: 32

B. Bed Size: Queen

C. Chore you hate: Emptying the dishwasher..hate it!

D. Dogs: I have one adorable Pug named Obi

E. Essential start to your day: A shower, I can't function w/o showering first

F. Favorite Color: Ultimately it's blue, but I also love pink

G. Gold or Silver: Silver..Unless it's White Gold

H. Height: 5'1..I'm a shorty :)

I. Instruments you play: None, although I hope to take guitar lessons soon

J. Job Title: Slave Stay At Home Mom

K. Kids: I have two boys ages 4 and 11 yrs old..LOVE THEM!

L. Live: Troutdale, Oregon

M. Maiden Name: Zollitsch....Yeah go ahead and try to pronouce that!

N. Nicknames: Nic & Nikki

O. Overnight Hospital Stays: Twice for giving birth and once for surgery

P. Pet Peeve: Honestly I have a ton..but here's one...hearing people chew 
food...GROSS

Q. Quote: Things happen for a reason

R. Righty or Lefty: Righty, but I do some things with my left..weird I know

S. Siblings: I have one little Sister

T. Time you wake up: Everyday I'm up by 6:15-6:30am

U. University Attended: None..went to Community College and Beauty School

V. Vegetables you dislike: I hate CANNED vegetables..gross..Fresh is best baby!

W. What makes you run late: Nothing..I have a fear of being late so I'm very early to everything

X. X-rays you've had: Dental, Jaw, Leg, Stomach...I think that's it

Y. Yummy Food: My favorite foods are Pineapple, Mexican food (YUM), Caramel, and Cheesecake

Z. Zoo Animal Favorite: The Cats..they are such strong gorgeous animals...although Monkey's are a close second


Alrighty guys, there's a little bit of useless info about Crafty Soccer Mom :) 

If you put this up on your blog let me know, I'd love to hear more about you as well.

If you haven't followed me via Google Friend Connect, please do, and I'd love to follow you back.

Have a great night!

Wednesday, August 24, 2011

T-Shirt Scarf

DIY T-Shirt Scarf

This has GOT to be the easiest T-Shirt scarf around..seriously!

I have two other T-Shirt Scarf's I will be doing soon as well..stay tuned.

But for this one this is what you do:


I got this Ladies Large Cotton T-Shirt from the Dollar Tree.
I picked black cause I love it, but then I realized it's hard to do a tutorial with a black shirt, sorry guys.


Lay it flat on a table.  Then cut a straight line right under the arm pit all the way across to the other armpit.
Now you have two pieces.
Toss the top half of the shirt aside for a future project, you only need the bottom half for the scarf.


Cut the hem off the bottom of the shirt.
Cut 1/2" strips (fringe) on the bottom of the shirt about half way up, or just shy of half way up the shirt.

Pull each piece of fringe so the shirt fringe curls up.  
Unfortunately I think my shirt had some spandex in it or something cause my fringe didn't curl up right, but I still like it as is :)


Now put it over your head and Voila! You have a beautiful new accessory :)

I love this, and it's so comfy...I will definitely make another one with a 100% cotton shirt, so I get the effect I want with the fringe.

This is great as casual wear, or dressy wear.  Also great for all ages.  Would make a fantastic homemade gift for someone. 

This would also look great with a T-Shirt that has a pattern in it, or Tie Dye.
Hope you all enjoy this! I will do a couple more T-Shirt Scarf Tutorials soon :)

On another note: 

Remember my friend Mindie that I did a guest post for on her blog Bacon Time W/ The Hungry Hypo?
You should totally go check out her blog...She has something fun going on every single day.
Take today for example, she has helpful, delicious meal planning recipes for you, that consist of meals that are $10 or less...
Seriously you should go check it out HERE

Have a fabulous night everyone!

Sunday, August 21, 2011

Duct Tape Belt

Duct Tape Belt


I made this Duct Tape Belt for my youngest son Jackson.  I love the way it turned out and it was a very quick project.  

Here's how I did it:


First I cut a strip of Duct Tape to 25 inches long.
I folded (hot dog style) one side of the duct tape towards the middle all the way down.
Then folded the other side to overlap opposite side just a tad so that I end up with 25 inches of Duct Tape that has no sticky, resembling the pic above.


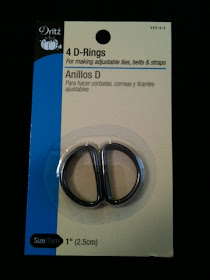
Grabbed two D-Rings


Put them on one end of my Duct Tape Strip, with the flat sides of the D-Ring on the underside of the belt.
Then I folded up the end to cover the D-Rings and taped it with Duct Tape.

And we're done! It's that simple.


Here's what it looks like :)  Isn't that adorable?  I love it!


Let's give a big round of applause to my handsome young model Jackson...who was less than enthused to help me with this picture :)  But he did it anyway for his Mommy..I have good boys.

If you haven't joined my blog via Google Friend Connect feel free to do so today, I'd love to have you as a follower and I would love to follow you back :)

Have a great day :)

Friday, August 19, 2011

Upcycled Kids Cape

Kid's Cape


Look at my handsome little Super Hero!

All I used for this project was a T-Shirt and a pair of scissors..that's it!

Here are the steps I took, and keep in mind this only took a couple of minutes..so EASY!
Ok first I laid the T-Shirt down flat on a table
I then cut both sleeves off the shirt
Then I cut up the side of the shirt on both sides
Last I cut the rest of the front of the shirt off, leaving a couple inches below the neck line.


This picture is all business...he is a Superhero after all :)  but in this pic you can see how much I left under the neckline in the front.  This way he can just pull it on and off his head with ease.


BAM..BANG..BOOM..I can fly!


I'd say this little Superhero LOVES his new cape!
I couldn't be happier with the results, it's totally awesome!
Clearly he's having a great time, cause I can't get him to hold still for a good pic lol :)  Always a good sign!


And..he's off to rescue a princess.....

If you have any questions about this project please feel free to ask, I'd love to help you out :)

You could take this a step further and add some lightening bolts on the back with Duct Tape like this...


Ok, don't laugh at my horrible little Lightening Bolts!  
LOL..ok you can laugh cause I'm laughing with you :)

I will be painting some nice ones on soon, along with the name "Action Jackson"

Thanks guys for visiting my blog, have a wonderful day!
Till next time :)

Thursday, August 18, 2011

Scrabble Art

Scrabble Art

Oh am I happy to be on my computer :) My Internet was down for the last 24hrs and I was having serious withdrawls!!  I'm so embarrassed to admit it, but it is true. It was horrible not having my blog world at my fingertips!
Thank goodness for my iPhone..whewwww! It helped me through the day :)

So I found this link for printable Scrabble Tiles HERE and I knew right off the bat what I wanted to do with them :)
Put them together to form the names of my family!

First I printed them out on white cardstock...then I cut out the letters I needed for my husband, kids, and my name.

I practiced on a piece of paper to see which way would look the best to intertwine our names, and this is what I came up with.....


I already had a frame handy, but I spray painted the back part black and placed the letters directly on the board using Glue Dots :)

Here's the finished product:


I know this picture is horrible, but I didn't want to be in it so I had to take it from this angle so my reflection wouldn't be seen :)

I love the way it turned out, this was so much fun!
Obviously REAL Scrabble Tiles would have been ideal, but this was a good runner up.

Have a great night, till next time!

Wednesday, August 17, 2011

Magnet Board

Magnet Board


Today I made a Magnet Board and I am quite pleased with the results!

I think I may make some of these for Xmas gifts...yeah I said it..you have to plan early folks lol :)
Well if you're like me and  have a large family and are a bit OCD you have to plan early,
any who, I digress :)

Here's what I did to create this total master piece:


First I used a Cookie Sheet that I bought at the Dollar Store, and spray painted it Baby Blue.


Then I made some Yo Yo Flowers, and Hot Glued them to the bottom left corner.
To see my tutorial on how to make Yo Yo Flowers go HERE


Then I hot glued small magnets to a few big buttons


And VOILA!  So at this point I needed to figure out a way to hang this bad boy..
I thought about hot gluing some ribbon to the back but then...
I had an AWW-HA! moment...


I hot glued the tab from a soda can...ok really it was a beer can..it's five o'clock somewhere right?
Just kidding..kind'a, it was from a beer can but from our recycle bin :)


Now it's proudly hanging in my office and I couldn't be happier with the results!
(Please excuse the darkness of the photo, it's hanging in a poorly lit area)

This was a ton of fun to make and super duper inexpensive.

Thanks for stopping by, till next time!

Tuesday, August 16, 2011

Button Art

Button Art

Today I felt like painting...I'm in a rather artsy craftsy kind'a mood right now :)

I had a couple canvases just hanging out...bored..waiting for me to get some sort of creative jolt

So I made this:


I painted the blue sky first, then the tree.  After all was dry I added buttons with a hot glue gun.

I had a lot of fun with this project, and really like how it turned out :) 

I originally planned on doing bright multi colored buttons on the tree, but I  went with greens/yellows instead this time around.  

Now I need to frame it and hang it up.  

Thanks for stopping by, till next time!

DIY Paper Bow

DIY Bow

Hey guys!  
Sorry I've been gone for a few days..I went to the coast with my hubby and kids :)


Aren't my boys adorable?!!  I think so, and they had a blast jumping off this sand cliff let me tell you lol!

and..

Yesterday I spent half the day at my oldest son's first Golf Tournament...I have to brag a little cause I'm so proud.....


He got 3rd place in his age division!!!

Ok, thanks for letting me brag..now onto the bow

These bows are really easy and I swear I will never buy another bow again since I now know how easy and cheap it is to make them!


Cut your paper of choice into 9 strips, lengthwise..about 3/4 in wide.
Keep 3 strips the original length.
Cut 1 inch off 3 strips.
Cut 2 inches off 2 strips.
Then cut the last strip down to 3.5 inches long.


Twist the strips to form a loop at both ends ( kind of like a charity ribbon)...then staple the center.
The littlest strip should be shaped into a circle.  You can secure it with a glue dot.


Start with your largest loops and start forming a bow, secure each loop with a glue dot.
Your last piece will be your circle piece and you place that in the center with a glue dot and you're done!

Plop that baby on a gift and you are good to go!

So the first time I did this, I realized that you should really take your time in your placement of your first three pieces.  You can see that my bow looks a little lop sided..but really on top of a present it would still look cool right?


SO I had a second go at it, using a magazine this time, and it looks much better!

These are so easy and fun...You could use a number of different materials to makes these:
Newspaper comics
Comic Books
Scrapbook paper
Felt
Recycled paper
Maps (which I think would look AWESOME)

Have fun with it!  

Thanks everyone, and have a totally awesome day today!