Wednesday, March 7, 2012

Duct Tape Coin Pouch


Hello Hello Hello!

Ok so here's the skinny...I'm totally sick..bleh!
The whole family is..well was...my youngest son is finally on the mend, but I however am not and I'm super pouty about it cause I'm never sick :(  Super sad face!

So I just had to make something today..I couldn't take it any more.  
I made this tiny Duct Tape coin pouch, which can be a super easy project for kids or beginners.

Here's how I did it..


I made a sheet of Duct Tape Fabric.
4 inches x 9 inches

The size doesn't really matter, you can make it however wide or long as you like. 


Here's the inside color...So I have Zebra Print on the outside, Red on the inside..Sexy!


Next I folded the bottom up to a spot that I liked.  I wanted to make sure there was enough above for the flap.


Then I taped the sides together. 
Guess what?...You're pretty much done!
You can see I added a little trim to the sides of the flap, not necessary though.


Now, we want our flap to stay closed on it's own.
You have two options here..
1. Add some sticky back Velcro
2. Add some magnets.
I went with the magnets this time around.


Bam! You're done!!

Easy Peasy right?!


If you want it to be more secure, I'd use the Velcro.

This can easily slip into your pocket, perfect for when you want to bring just your ID and a few bucks.

It's simple, inexpensive, and totally chic.

Easy enough for kids or beginners. 
If you used solid colors you could add some stickers to it for decoration.

Alright kids...I have to go blow my nose..TMI?  

Hopefully I'll be better soon so I can bring you guys some new fun stuff to make.

Until then..

Happy Crafting!

Monday, March 5, 2012

Chalkboard Necklace


Here is a super cute, inexpensive, easy and fun craft  :)

Here's what you need:
Little Wood Shapes (Square, Rectangle, Heart, Circle, etc) from the wood section of your Craft Store
Jewelry Bail
Necklace (Yarn, Hemp, Chain, Ribbon, etc)
Chalkboard Spray Paint
Chalk :)


Step one:
Lay down some newspaper outside and spray your wood pieces. The one I'm using is a rectangle, it's about 2"x1.5".  I have also used the hearts, those are adorable.
I spray two coats, it dries pretty quickly.


Step 2:
After the paint is dry, glue on your bail to the back.  
I like to use E6000 glue for gluing on bails.


Step 3:
Add your necklace and color on your new Chalkboard Necklace!

I chose to use a St Patrick's Day theme, I don't want to get pinched!

This is so much fun for kids, you can change it up everyday, or for each holiday.
Put your initial on it, a smiley face, your favorite jersey number...the list goes on and on.

The wooden pieces are super cheap, a package is usually under a dollar and you get several pieces in the package depending on what shape you choose.

The brand of Chalkboard Spray Paint I used was: 
Rust-Oleum Black Chalkboard Spray Paint

Here are a couple other projects I've posted on my blog in the past using this spray paint:


You could also glue a magnet to the back  instead of the bail and make it a refrigerator magnet instead of a necklace!
Have a great day 
and 
Happy Crafting!

Thursday, March 1, 2012

3D Hand Art


Some mindless easy fun...that's what I am bringing to the blog today!

Isn't this cool??!!
Your hand appears to be floating on the page, I love it :)

3D art that is simple, fast, easy and fun all rolled into one!

All you need is:
Markers
Paper
Pencil

Step One:
Trace your hand or someones hand onto a piece of paper lightly w/ pencil.

Step Two:


Draw Horizontal lines across the page, making sure to skip over your hand print.

Step Three:


Starting with Line #1 make small arcs connecting the lines on either side of the hand print.
Then do the next color...provided you used multiple colors like I did.
You can use all one color marker...or go crazy and make it rainbow..your choice.


Done!

This is so much fun and easy for kids to do as well.

I was thinking of tracing my boys hands onto a canvas and then painting the lines...it would make for a really cool art piece!

Happy Crafting!

Wednesday, February 29, 2012

Duct Tape Clutch


This is what I've been working on today....A Duct Tape Clutch!

So fun, I just love it!  The front is kind of plain because I haven't decided what I want to do with it yet.

My favorite part about this clutch....


I added a Zipper!  Yep I said it..a ZIPPER!!!

And here's a look inside..


On one side I have 3 credit card slots...lined with Hot Pink


And on the other side a pocket for your cell phone or whatever...


Isn't that cute? 
The dimensions are approx 8.5in x 5.5in

Keep in mind since it's ALL Duct Tape (minus the zipper of course), that means its waterproof!
This would be excellent for trips to the beach, you could use it as a wallet.
You could use it as a make up bag as well, or as a pencil pouch for school.

The best part about this project, aside from the zipper, is that I found this Zebra print Duct Tape on clearance for $1.68! That's a smoke'n deal!

Hope you enjoyed taking a look at my Duct Tape Clutch :)

Happy Crafting!

Monday, February 27, 2012

Package Pal Loot

Hello!

Sorry I've been M.I.A. all week, I was really sick...but I'm baaaaaaaaccck!

So a few weeks ago I did a post about Package Pals.  A fun homemade gift exchange hosted by Jamie over at 

I was given a pal, randomly selected by Jamie, and I was to either make my pal something or give her some crafting supplies.

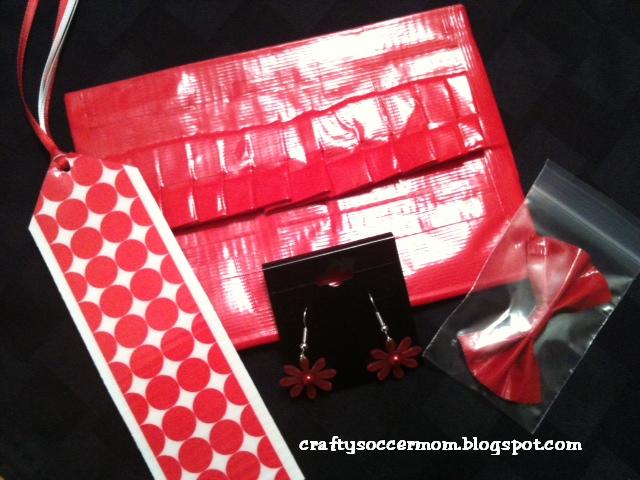
So this is what I made my pal...The only thing I really know about her is that she likes the color Red..


A Duct Tape Makeup Bag, Duct Tape Book Mark, Duct Tape Hair Bow, and Daisy Earrings..
all made by yours truly.


Here's the Duct Tape Bag...doesn't have to be for Makeup.
I made some ruffles on it...
Oh and here's the best part about it....


It has a Ziploc enclosure!!!
I know I know...I'm so rad!
I totally love this..I'll be making myself one too :)


Next we have our Duct Tape Bookmark...cute huh?
The back is solid Red, and it has Red & White Ribbon on top.


Here we have one of my infamous Duct Tape Bows...Red just for her.
I sell a lot of these little bad boys...I have hundreds of different styles.
There is a bobby pin on the backside.


Last but not least a pair of my Daisy Earrings..In red of course to go along with the theme.
These are made of very lightweight plastic.

So there you have it.  My gift to Donna, my package pal.

Hope she likes it!

Have a great day
and 
Happy Crafting!

Tuesday, February 21, 2012

DIY Dog Toy

Good Morning!


Today I'm showing you this DIY Dog Toy I made for my pug Obi

This is so simple and self explanatory that I didn't take pics as I went along.

All I did was cut up some T-Shirts (I have a stock pile for crafts) into 1 inch- 1 1/2 inch wide strips and about 15 inches long...

I used only 10 strips cause I have a small dog and didn't need a big toy.

I tied a knot in the middle and then braided the fringe.

After I braided a section of fringe I used a needle and thread and did a couple stitches to the end of the braid to keep it together.
Nothing fancy..it's a dog toy :)

NOW..

You can also cut long strips, make one long thick braid,  and then tie a knot on each end..which I think I'll do next time.

I would suggest making the strips at least 20 inches long if doing that..possibly more.

Easy Peasy!


"Obi...here's a new toy!"
He's got that...Mommy's talking to me in that high pitched voice look right now LOL


"Ugh..really? Ok..I posed..where's my treat woman!"

Have a great day 
and
Happy Crafting!

Monday, February 20, 2012

Easy Monkey Bread


Ohhhhhh yeah! 
Check out that oooey gooey goodness!
All that can be yours...and I'm going to show you how with just a few easy steps :)

Let's get this party started!

Here's What You Need:
4 Pack of Refrigerator Biscuits (10oz)
1/2 Cup of Sugar
1/2 Cup of Brown Sugar
3/4 Cup of Butter
1-2 Teaspoons of Cinnamon *optional*
Bundt Pan

Start by Preheating your Oven to 350 degrees

Next lightly spray your Bundt Pan with Cooking Spray.

Get a Gallon Size Ziploc Bag and add your Sugars and Cinnamon.


Take your biscuits and with clean kitchen scissors cut them all in half
and put the cut biscuits in the Ziploc with the sugars and shake it up.
Then transfer the biscuits into Bundt Pan.

I did one package of biscuits at a time..cut them, then put them in the baggie, tossed them, then put them in the Bundt Pan, and then repeated with the next roll of biscuits.


Here they are in the pan all coated with the sugars 


Next take your butter, pop it in the microwave and melt it...once melted add the sugar that was left in the Ziploc to the butter and mix it up.
You could do this on the stove top too if you'd prefer.
Once incorporated, drizzle on top of the biscuits.

Pop it in the oven for about 30 minutes.
Or until golden brown and no longer doughy in the center.

 
Once it's done, take it out of the oven and let it sit for a few minutes.
Then put a plate over the top of the Bundt Pan, and flip it upside down.

Isn't that gorgeous!

Let me tell you...everyone will LOVE this!

Perfect for brunches, holiday's, or a nice Sunday breakfast...

Have the kids join in the fun, and let them shake the biscuits in the bag, they'll love it!

Enjoy!