Monday, December 12, 2011

Duct Tape Stud Bracelet

Duct Tape Stud Bracelet


Here is a very simple cuff bracelet that you can make in minutes!
This bracelet is edgy and fun and would go great with that hot red lipstick :)


I took two 9 inch strips of duct tape and put them on top of each other so no sticky was showing, trim sides if necessary.
Duct tape is about 2 inches thick..I didn't want my bracelet that wide so I cut off about 1/2 an inch.


Next I took some small Brads and poked them through the Duct Tape and folded down the clamps.
When the desired design was complete I took a strip of Duct Tape about 3/4 inch wide and 5 inches long and put it on the backside of the bracelet to hide the back of the brads...and so the clamps didn't scratch my skin.


Last step...I added some black sticky back velcro to the bracelet so it could close.
Done!


I think it looks pretty rad! 
You can get super creative with the brads...instead of a design, you could make them into a letter..
you can use colored brads, design brads, big brads...little brads..I feel like Bubba Gump....
spicy shrimp, sweet shrimp, big shrimp, lemon shrimp, shrimp stew...LOL!!!
Do you know what movie that's from??? I'm sure 99% of you do :)

Yup..Forrest Gump!

Alright ladies! 
Wishing you a wonderful night and..
Happy Crafting!!

Tuesday, December 6, 2011

Journal Jars

Journal Jars


This is such a fun project and fun for all ages.

This would make a great gift for a kid going off to college, or that person that you just don't know what to get for Christmas.

First I printed up my Journal Entry Topics...
You can download mine, or make up your own...

You can download this HERE

OR

In Black & White HERE

Then....


I cut them into strips..


Like so!

Then I curled them with scissors, like you would ribbon.  You could also just fold them up.


Paired with a journal these would make a really fun gift :)


I just threw mine in this jar..however you could definitely make them a bit prettier with a nice jar with some ribbon around it.

You could also make your journal topics specific to a particular person you are gifting this to...such as a child, college student,a new mother, a teacher....

Happy Crafting!

Thursday, December 1, 2011

Duct Tape Slap Bracelet

Duct Tape Slap Bracelet's


FLASHBACK! Oh yeah baby, Slap Bracelets are back...or maybe they never really went away and I just didn't know it :)

Either way I'm excited about this cause it involves DUCT TAPE!
You know me...I should be enrolled in D.T.A. aka Duct Tape Anonymous!

 
So I bought these Slap Bracelets and then covered them in Duct Tape..
and that's pretty much it LOL :)

I will admit..I had to throw my first one away cause it was a lot hard to cover these bad boys then I thought it would be.


A big Thank You to my wonderfully handsome hand model!
Also known as my oldest son :) He's the best!


I have no idea why I think these are so cool..AND I may or may not have a very red wrist from slapping these on my wrist over and over just for fun...

Flashback toys are always great and it's even more fun when you can incorporate them into the present.

Have a great night!
and 
Happy Crafting!!
Monday, November 28, 2011

Italian Parmesan Roasted Garbanzo Beans

Italian Parmesan Roasted Garbanzo Beans


This is such a yummy quick snack that is also healthy.
Great snack for the kids, for a party or to package up as a gift.

Here's how to make this tasty treat:
Ingredients...
1 Can of Garbanzo Beans (Chick Pea's)
1 Tablespoon of Italian Powder Marinade Seasoning (or powdered dressing)
1 Tablespoon of Extra Virgin Olive Oil (I've used regular too)
1 Tablespoon Parmesan Cheese (Optional)
Salt to taste
You'll need one can of Garbanzo Beans A.K.A. Chick Peas

Rinse your beans and lay them out on some paper towels and get them good and dry.  After drying mine off, I left them on a dry paper towel while the oven heated up to 400 degrees.
Now you need 1 Tablespoon of seasoning..this is where you can really spice it up and make it your own.  
The key is to use a powder flavoring such as: BBQ Dry Rub, Powdered Marinade (comes in lots of flavors), Powdered Salad Dressing Flavors such as Ranch or Italian.

I used what I had in the cupboard...Italian Marinade Seasoning.


Toss beans with 1 Tablespoon of EVOO and 1 Tablespoon Italian Seasoning
 A dash or two of salt

Now spread them out on a baking sheet.
I covered my baking sheet with foil for easy clean up :)
Bake in a 400 degree oven for 35-40 minutes..or until crunchy.
 Making sure to toss half way through.

If you choose to add the Parmesan Cheese (which I highly recommend), add the cheese during the tossing process half way through the cooking time.


What you are left with are these yummy crunchy Italian Parmesan Roasted Garbanzo Beans!

These were kid tested...Mother approved!
You can get super creative with the seasoning and this is a very cost effective snack, I'd say it cost around $1 total to make :)

Have a great day!!

Wednesday, November 23, 2011

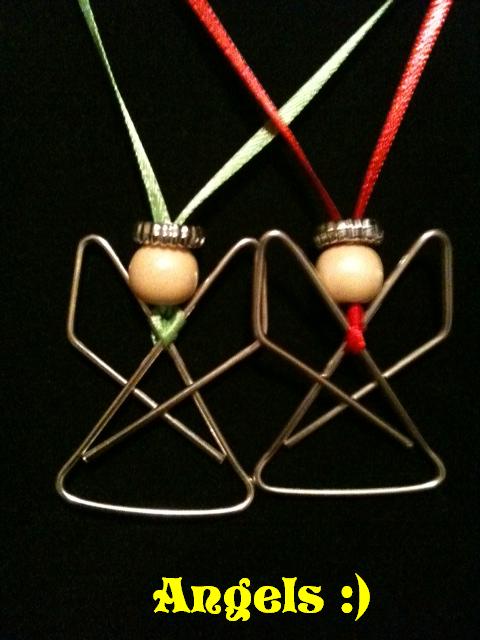
Paper Clip Angels

Paper Clip Angels


I love Angels..I think they are beautiful :)

This is a craft that is fast, easy and inexpensive...great for all ages!
Here's how to do it:


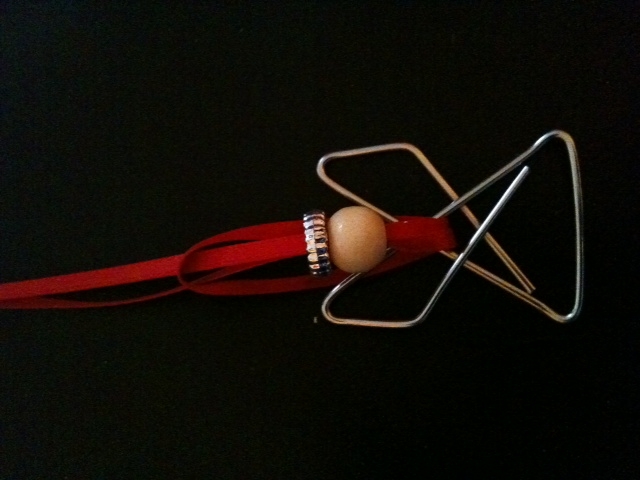
You will need some Butterfly Paper Clips.  These are found in the Home Office section of most stores (Target, Walmart, etc) in the Paper Clip area.


I also used these Wheels Beads...excuse me according to the packaging they are "Classy" Silver Wheel Beads LOL :)
I got these because I like my Angel to have a little Halo.


You will need some Ribbon or String..I prefer the ribbon, I think it's prettier but that's just my preference :)
And last but not least you'll need beads.
Now the only beads I had that were big enough for the head were my wooden beads, but you can use any kind of bead (Pearls, Plastic, Glass, etc)


Cut a piece of ribbon and tie a knot at the non loop end.  String your "Halo" on first than your Bead.


Now put the loop end of the ribbon thru the middle of the Paper Clip as shown above.


Take the knotted end and thread it thru the looped end and pull tight.


Done! Now you have just made a beautiful Angel :)
And it took only a couple seconds!


I just love these!

You can use them as ornaments on your Christmas Tree, hang them from your rear view mirror, make a necklace, give them as a gift..you name it.

I would like wish each and every one of you a wonderful Thanksgiving filled with love, laughter and happy memories!

Happy Crafting!

Monday, November 21, 2011

Gold Christmas Tree

Gold Christmas Tree


Isn't she beautiful?? Oh I just love this!

All I used was...
This Styrofoam Cone and some Gold Thumbtacks from the Dollar Tree!


I also bought this tiny glass angel tree topper to go on top of my gold tree.
It's Halo is gold so it was a perfect match!


I simply pushed the thumbtacks into the foam, making sure to overlap a little bit so there wasn't any of the Styrofoam showing.

I used approximately 500 tacks for this...and it took me about 40 minutes to push them all in.  I had fun, I just watched tv while I did it.


The glass Angel fit on top PERFECTLY! I am so thrilled with this craft.
I wish I could photograph it a bit better but it's so shiny it's very difficult to capture it's beauty :)
You could also spray paint the tree after you put all the thumbtacks in it to fit your holiday decor or paint a few of the tacks different colors to give the illusion of Christmas Lights..
you have a lot of options to make it your own:)
Have an awesome day
and
Happy Crafting!!

Thursday, November 17, 2011

Minnie Mouse Hair Clip

Minnie Mouse Hair Clip


I made this little cutie from T-Shirt scraps and some Duct Tape for the bow.

If I haven't mentioned this before Mr Crafty Soccer Mom loves all things Mickey Mouse, and has been a collector since his childhood.  
So there is a lot of Mickey love in our house :)

Here's what I did to make this little gem...
I cut a few strips of T-Shirt scrap...One long, two half the size of the long one.
Then I made Rosettes...
Here are the Rosettes...


Then I hot glued the Rosettes onto a piece of black felt.
Sorry about the picture quality..it's really hard to photograph black on black.
I cut around my Minnie Mouse shape and then cut out a circle of felt for my clip to attach to


 I cut a slit in the circle of felt..put the back part of the clip through and then hot glued it down to the back of the Minnie Mouse


Final step was adding this mini Duct Tape bow.  I attached it with Hot Glue.


Here is the final product in my clipped into my hair :)


Here I clipped it to a head band :)
Have a great night
and 
Happy Crafting!!